Frontend install of existing server
A Stacki frontend can be installed on top of an existing Red Hat based server. The server must be running the x86_64 version of CentOS or RHEL 7.6.
__REALLY IMPORTANT__: During the Stacki installation it is possible that Stacki will overwrite certain system files. Please don’t install onto an existing production server without prior testing.
To perform this installation, log into the frontend and download two pallets and one RPM
IMPORTANT: It is very important that you supply the stacki ISO and not the stackios ISO. Very.
-
Stacki ISO. Download the Stacki ISO and put it on the server you want as the Stacki frontend.
- stacki-5.6.5-redhat7.x86_64.disk1.iso (MD5: de43aea1da528cc954388d03ecb5f978)
-
OS Pallet You’ll need to download ONE of the following OS pallets:
- CentOS 7.6 Use the “Everything” or “DVD” ISOs.
- Oracle Linux 7.6 - You have a subscription right?
- RedHat 7.6 - You have subscription right?
- Scientific Linux - It’s out there somewhere. Someone used to use it.
-
Install Script. Mount the stacki iso, and install
stacki/5.6.5/redhat7/redhat/x86_64/RPMS/{stacki-fab-5.6.5,foundation-python-3.8.3}*.rpm
Execute frontend-install.py:
# ./frontend-install.py --stacki-iso=stacki-5.6.5-redhat7.x86_64.disk1.iso
Using just the stacki iso will create a frontend but then you have to add an OS pallet after the reboot. To shortcut that step, add an os pallet on the command line with the “–extra-iso” option and supply any OS pallets you have:
With the full CentOS iso ( or rhel-server iso or Oracle etc.)
# ./frontend-install.py --stacki-iso=stacki-5.6.5-redhat7.x86_64.disk1.iso --extra-iso=CentOS-7-x86_64-Everything-1810.iso
If you want to use the current network, route, DNS, timezone, root password and do not want to use the wizard, throw the “”–use-existing” option:
# ./frontend-install.py --use-existing --stacki-iso=stacki-5.6.5-redhat7.x86_64.disk1.iso --extra-iso=CentOS-7-x86_64-Everything-1810.iso
If you have not used the “–use-existing command”, the above any of the previous steps display the Installation Wizard to set system configuration including: network, password, timezone, pallets, and partitioning.
Installation Wizard
The Installation Wizard is the same for either the New or the Existing installation methods. The installation that happens after going through the wizard is either a typical CentOS/RHEL server install (New) or a set of scripts that run to create the Stacki software stack (Existing).
The Installation Wizard is now text-based, because, The 90s!
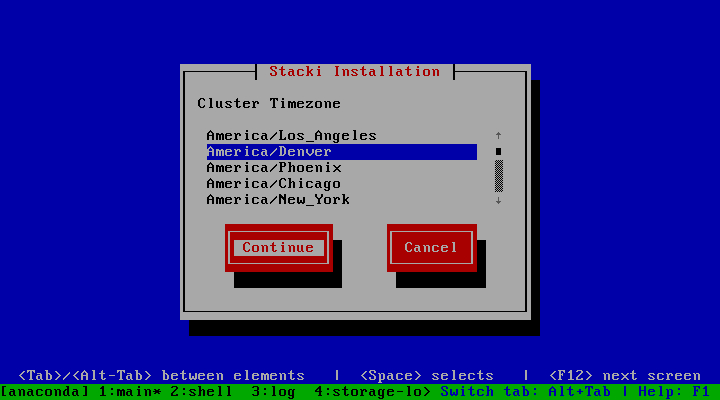
Timezone
The first screen will appear and you will be prompted to enter your timezone:
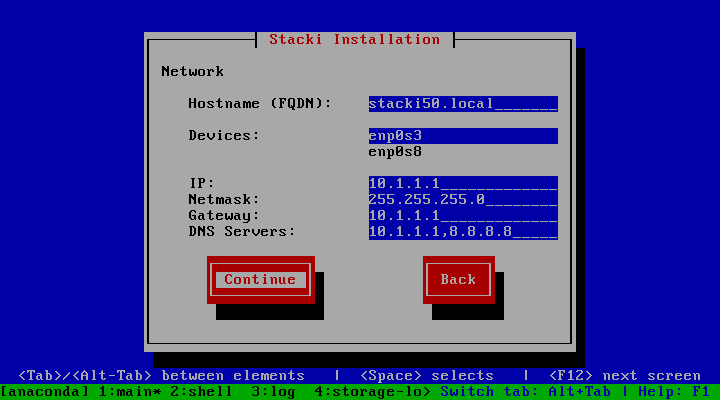
Network
Do not get this network wrong! Changing it after the fact means a RE-INSTALL of the frontend.
The network configuration screen allows you to set up the network that will be used by the frontend to install backend hosts.
- Fully Qualified Host Name - Input the FQDN for the frontend.
- Choose from the network Devices to select the frontend’s network interface.
- IP address of the interface.
- Netmask.
- Gateway.
- DNS Servers - More than one DNS Server can be entered as a comma-separated list (i.e., 8.8.8.8, 4.2.2.2, 8.8.4.4).
Click Continue to configure the network interface.
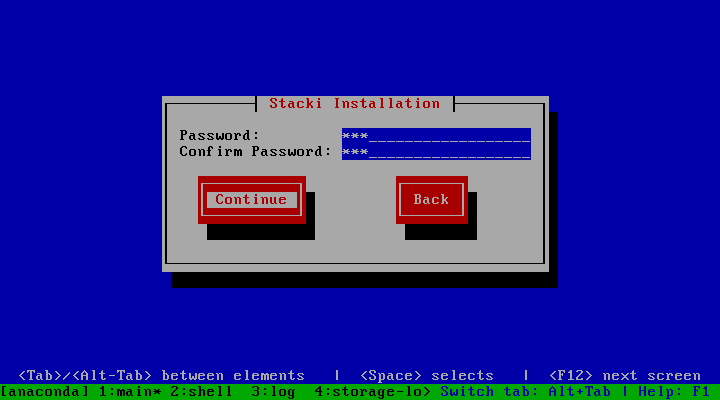
Password
Enter the password for the root account on the frontend. This is also the root password for the backend nodes. Choose a better one than shown here.
Choose Partition
If Automated mode is selected, the installer will repartition and reformat the first discovered hard drive that is connected to the frontend. All other drives connected to the frontend will be left untouched.
| Partition Name | Size |
|---|---|
| / | 16GB |
| /var | 16GB |
| swap | 1GB |
| /export (symbolically linked to /state/partition1) | remainder of root disk |
When using automatic partitioning, the installer repartitions and reformats the first hard drive (e.g. sda) that the installer discovers. All previous data on this drive will be erased. All other drives will be left untouched. If you are unsure about how the drives will be discovered in a multi-disk frontend, select Manual mode.
In Manual mode, the installer brings up a partition setup screen after the wizard exits. In this mode, specify at least 16 GB for the root partition and a separate /export partition - which should be the largest partition. You should add a swap partition, and /var if you have made / only 16GB.
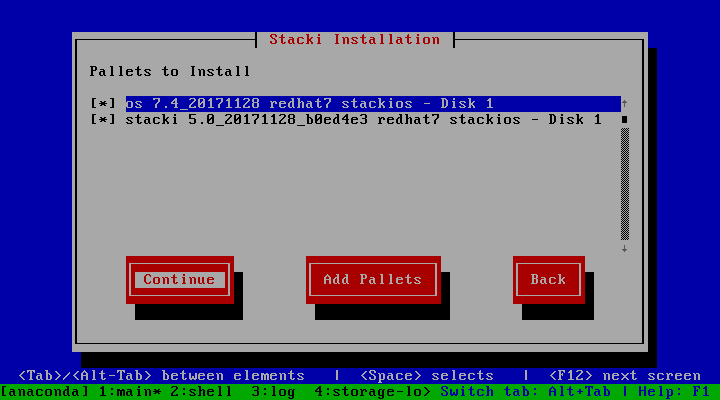
Add Pallets
Choose the Pallets you want to install.
Booting from a DVD/USB, pallets should automatically load onto the list for you to choose.
** Please note:** In an Existing installation you will only see the stacki pallet - even if you have supplied the –extra-isos parameter.
In a New installation with the stackios pallet, you should see two pallets: the the stacki and os pallets to install.
If you want to add pallets from another Stacki frontend or from a webserver hosting pallet ISOs, Choose Add Pallets and supply the correct url. Once you’ve added all the pallets, choose Continue
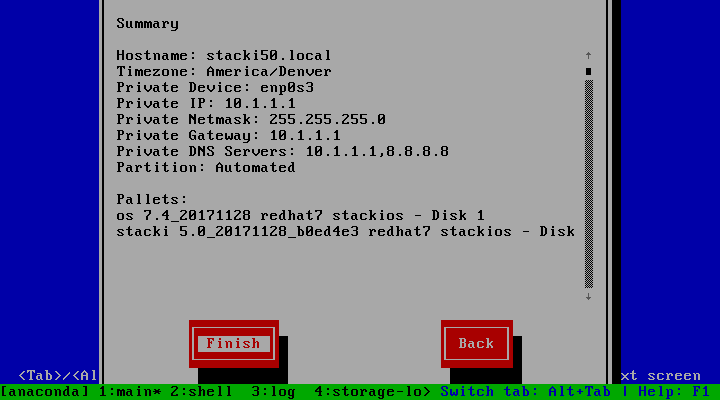
Summary
Review the installation parameters and click Continue to proceed.
Once the install is done, you will be prompted to reboot. Reboot.
# reboot
Verify
Once the frontend is up, check to make sure you have what you think you have:
You should see one host:
# stack list host
HOST        RACK RANK APPLIANCE OS     BOX      ENVIRONMENT OSACTION INSTALLACTION COMMENT
stacki50    0    0    frontend  redhat frontend ----------- default  default       -------
And you should see two pallets:
# stack list pallet
NAME   VERSION RELEASE ARCH   OS     BOXES
stacki 5.6.5   redhat7 x86_64 redhat default frontend
CentOS 7       redhat7 x86_64 redhat default frontend
Your Stacki frontend is now ready to install backend servers.
** However **
If you didn’t supply an OS pallet with the “–extra-iso” option to frontend-install.py, and if you only see the stacki pallet:
# stack list pallet
NAME   VERSION RELEASE ARCH   OS     BOXES
stacki 5.6.5   redhat7 x86_64 redhat default frontend
You need to add an OS pallet.
The OS pallet is used as the base OS to install onto the backend nodes. This will be either the CentOS installation DVD(s) or the Red Hat installation DVD.
To add an ISO pallet to the Stacki Frontend, first download the OS iso to the frontend, then execute:
# stack add pallet CentOS-7-x86_64-Everything-1810.iso
Then enable the ‘CentOS’ pallet. This makes the ‘CentOS’ repository on the Stacki frontend available for backend installs:
# stack enable pallet CentOS
# stack list pallet
Should produce output similar to:
NAME   VERSION RELEASE ARCH   OS     BOXES
stacki 5.6.5   redhat7 x86_64 redhat default frontend
CentOS 7       redhat7 x86_64 redhat default frontend
And now Your Stacki frontend is now ready to install backend servers.
Edited by: Bill Sanders on Mon Oct 26 12:41:04 2020 -0700
Commit: 9d1f858