Frontend install new server
It is of course, recommended that you use the newest release when testing or building new clusters. Please note, the last working release of StackiOS is 5.4.1 (link below).
Download the Stackios ISO file. stackios-5.4.1-redhat7.x86_64.disk1.iso (MD5: 03daf2291e8d6617f8ae1f4d5e821ed6)
Burn the file to a DVD and mount it in an external or internal DVD drive or on the virtual media for the server to be installed. Installing a frontend will completely erase and reformat the hard disks in the server. So use caution when deciding which server to designate as your frontend.
A USB is the same process as using a DVD, you just have to burn the file to a USB drive and choose that at the install screen.
Boot the server with the DVD (or virtual media mounted) and the following screen will appear after the BIOS is initialized:
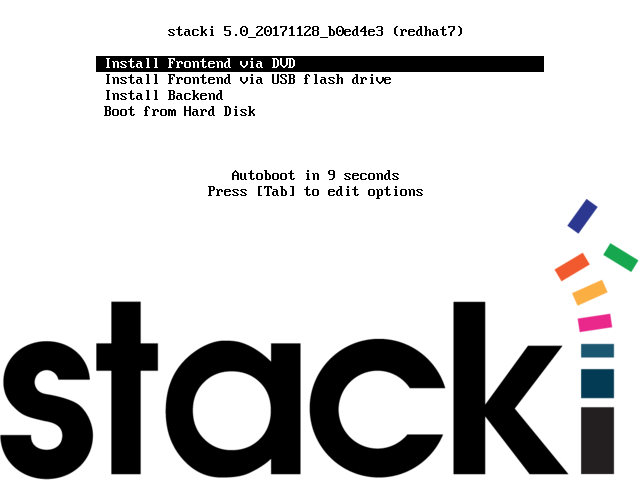
If you don’t see the above screen, go back to the requirements section and make sure the DVD is the first entry in the boot order.
If booting from USB, choose the second option.
You can hit enter or just wait a few seconds and the Stacki frontend installation will begin, and you will soon see the Installation Wizard.
Installation Wizard
The Installation Wizard is the same for either the New or the Existing installation methods. The installation that happens after going through the wizard is either a typical CentOS/RHEL server install (New) or a set of scripts that run to create the Stacki software stack (Existing).
The Installation Wizard is now text-based, because, The 90s!
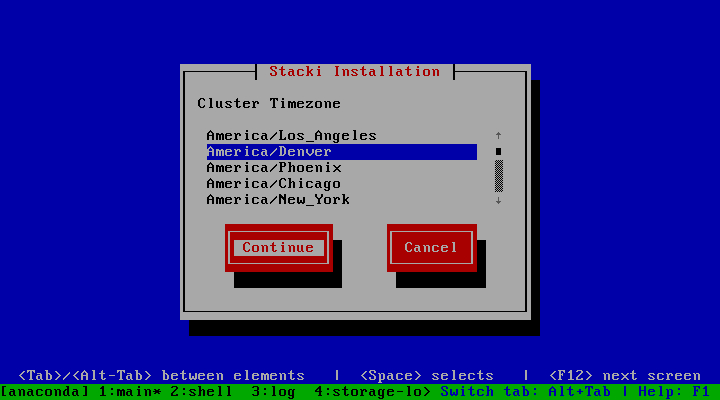
Timezone
The first screen will appear and you will be prompted to enter your timezone:
Network
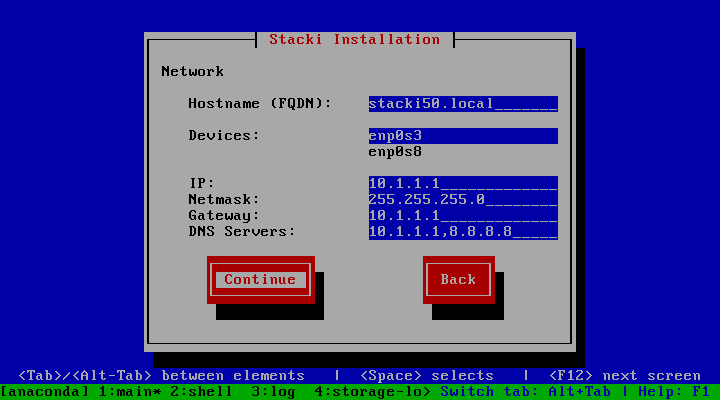
Do not get this network wrong! Changing it after the fact means a RE-INSTALL of the frontend.
The network configuration screen allows you to set up the network that will be used by the frontend to install backend hosts.
- Fully Qualified Host Name - Input the FQDN for the frontend.
- Choose from the network Devices to select the frontend’s network interface.
- IP address of the interface.
- Netmask.
- Gateway.
- DNS Servers - More than one DNS Server can be entered as a comma-separated list (i.e., 8.8.8.8, 4.2.2.2, 8.8.4.4)(more than two nameservers is stupid.)
Click Continue to configure the network interface.
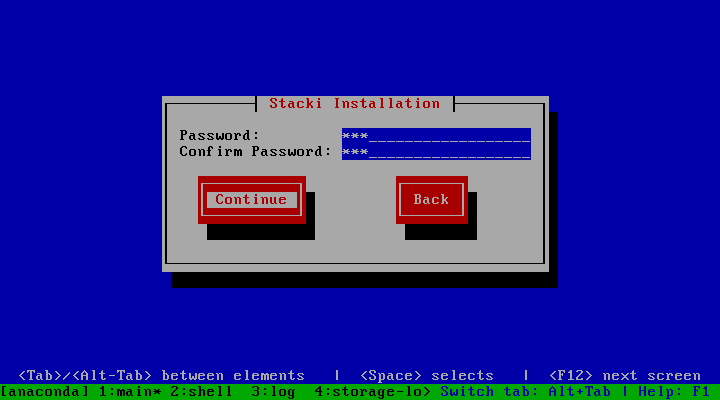
Password
Enter the password for the root account on the frontend. This is also the root password for the backend nodes. Choose a better one than shown here.
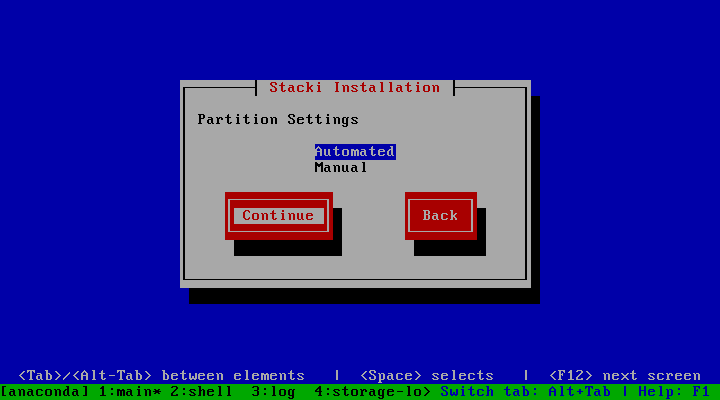
Choose Partition
If Automated mode is selected, the installer will repartition and reformat the first discovered hard drive that is connected to the frontend. All other drives connected to the frontend will be left untouched.
| Partition Name | Size |
|---|---|
| / | 16GB |
| /var | 16GB |
| swap | 1GB |
| /export (symbolically linked to /state/partition1) | remainder of root disk |
When using automatic partitioning, the installer repartitions and reformats the first hard drive (e.g. sda) that the installer discovers. All previous data on this drive will be erased. All other drives will be left untouched. If you are unsure about how the drives will be discovered in a multi-disk frontend, select Manual mode.
In Manual mode, the installer brings up a partition setup screen after the wizard exits. In this mode, specify at least 16 GB for the root partition and a separate /export partition. The /export partition should be the largest one on the disk. You should add a swap partition, and /var of about 16-20GB if you have made / only 16GB.
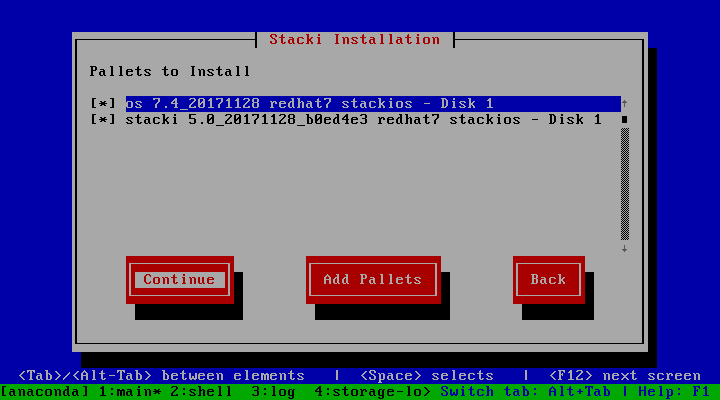
Add Pallets
Choose the Pallets you want to install.
Booting from a DVD, pallets should automatically load onto the list for you to choose.
In an Existing installation you will only see the stacki pallet - even if you have supplied the –extra-isos parameter.
In New installation with the stackios pallet you should see two pallets: the the stacki and os pallets to install.
If you want to add pallets from another Stacki frontend or from a webserver hosting pallet ISOs, Choose Add Pallets and supply the correct url. Once you’ve added all the pallets, choose Continue
Summary
Review the installation parameters and click Finish to start the install.
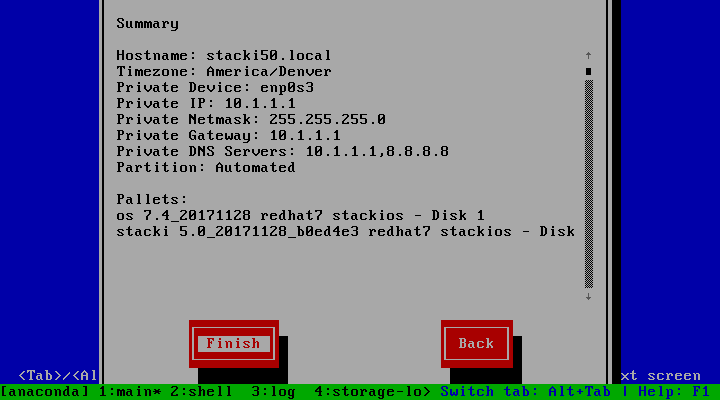
If this was a new frontend installation, the frontend will now format its filesystems and copy the pallets from the DVD onto its hard disk. Next, it will install all the packages and then run post configuration scripts. When this completes, the frontend will reboot.
Check to make sure you have what you think you have:
You should see one host:
# stack list host
HOST     RACK RANK APPLIANCE OS     BOX      ENVIRONMENT OSACTION INSTALLACTION COMMENT
stacki50 0    0    frontend  redhat frontend ----------- default  default       -------
And you should see two pallets:
# stack list pallet
NAME   VERSION RELEASE ARCH   OS     BOXES
stacki 5.4.1   redhat7 x86_64 redhat default frontend
CentOS 7       redhat7 x86_64 redhat default frontend
Your Stacki frontend is now ready to install backend servers.
Edited by: Bill Sanders on Mon Oct 26 12:41:04 2020 -0700
Commit: 9d1f858